
|
Best Games - Burnout Paradise
Does the idea of spinning donuts around the infield of a baseball stadium sound appealing? Would you like to launch a car off a ramp, sail an unreasonable distance, and nail a perfect 4 wheel landing losing no momentum? Would you like to nudge a supercar into a barrier and watch it crumple like foil knowing there would be no consequences or injuries? What if you could drive impossibly fast not only over the road, but through buildings, on train tracks, on park pathways, and more? Burnout Paradise has you covered. Burnout Paradise might be a perfect driving game. You will notice that I didn’t write ‘Racing Game’. Burnout Paradise is a driving game. It’s an exploration game. It’s a toy car sandbox game. There is racing in it but it’s not, strictly speaking, a racing game. The draw of the game is not the racing. I suppose for some people it might be but the game isn’t really designed around the racing. It’s designed around the driving. No matter what you do in the open world of Burnout Paradise, the game tracks it. How far you drive. How fast you drive. How much time you spend in the air. How many flips and spins you do. How many cars you crash, both your own and your opponents. If it’s a trackable stat the game probably tracks it. The game tracks it and then rewards you for it. It incentivizes driving over winning races or completing challenges. Burnout Paradise is a game about driving. There are a lot of people who didn’t like it when the Burnout series shifted from the focused event based structure to a flowing open world with potential events at every intersection. There were complaints that it took too long to get from one event to another, or that it was too easy to get lost in the labyrinth of city streets and shortcuts. Not liking a game is no real crime. There are and were certainly other games for people who didn’t enjoy the open world of Paradise, but I can’t help but feel like they missed the point. It’s a driving game not a racing game. The events are secondary to the reason you load the game up. You play Burnout Paradise to drive. You play it to drive in the most irresponsible and chaotic way possible. You play it to manifest fantastical driving situations. You play it to enjoy the feeling of speed and impact and exploration. Burnout Paradise is about driving and it is one of the best games.
0 Comments
Imagine you were to get to see some amazing old sculpture. A real museum piece. The Venus De Milo. You get your eyes on the Venus De Milo. You’re looking at it and you want to steal it. There is a museum curator watching you, there are security guards, other museum patrons, etc. There is absolutely no way they will let you do that. Also, the statue has to weigh close to 2 tons. You aren’t going to be hauling it out on your back, but you can take a picture of it. Maybe a lot of pictures. Maybe a lot of pictures with a camera that can capture depth and minor variations in the surface of the marble. Pits, cracks, dust, all of it. You and your camera take a quick buzz around the Venus snapping shots the whole way, and bug out. Now that you have all of this information in images, it should be possible for you to start with a blank approximation of the Venus De Milo and recreate all of those details. Will it be exactly the same? No, of course not. Could you deceive the other art thieves with it? Will it look convincing enough from a distance to get you into all of the art thief parties? Only one way to find out. Now since I do most of my art stealing digitally and figuratively, I set up a tool to make that high detail image capture easier. You see, when you set up digital 3D models for use in real time applications, that is exactly what you do. You take heavy, detailed, high resolution art and you crush it down to something that a computer can draw to a screen 30, 60, 90, or 120 times a second. The better you can steal that detail and pack it up into images, the more convincing the final result will be. Some stuff I have been working on required nice seamless tiles of high detailed fakery. There are tools and techniques that let you do this, but most of them are clumsy, slow, or expensive. I spent some time this past week to fix that. Just to be clear, I haven’t made anything revolutionary here. This isn’t some sort of stand alone tool. I put together the equivalent of a carpenters jig. A simple tool that helps you to do a more complicated job more easily. If that sort of thing doesn’t seem up your alley you can bail now. It’s okay, I get it. I’m going to break down how I set up one of my tools in Blender. Let’s start with the camera. I set up a single orthographic camera right above my work area and set the orthographic scale to 2. I set it to 2 because I will be using a 2x2 plane as the extents of my texture. You can set it to whatever size you like, but I find this works for me. 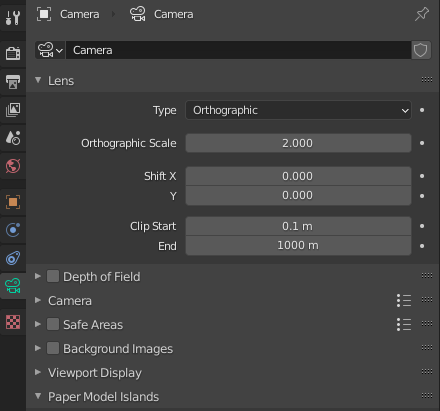 I also set its render size to 4096 x 4096. You could set it to 2k or 8k or whatever size you want, but I wanted nice high resolution square textures at the end of this process. Your textures don’t need to be square, but that’s for you to decide.  You will also notice that I set the output to the openEXR file format. This isn’t strictly necessary but openEXR can contain a 32bit color depth and a linear color profile. sRGB non-linear color spaces, like 59.94hz NTSC signals, is one of those things that should probably be un-invented. Since we can’t do that, keeping your textures in a linear format, while not entirely required, is good texture hygiene. Under Render Properties I set the display device in the color management dropdown to None. This prevents visual color crunching from alternate color profiles.  This is what the camera setup looks like with a 2x2 plane under it. Not really very interesting but it works. 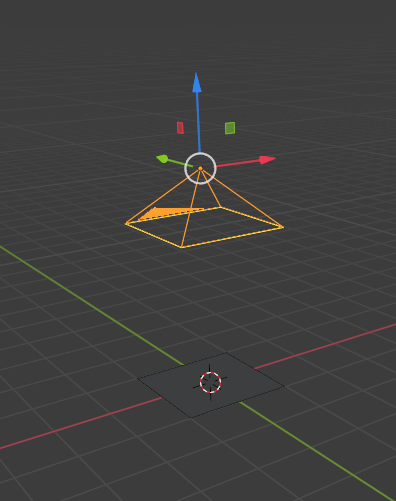 Now that the camera is taken care of I need to model something under there. I quickly made up this screw head, since it’s the sort of thing that you wouldn’t want to model a thousand of and is a great candidate for casting off to the 2D world of texture images.  And this is what the camera sees. 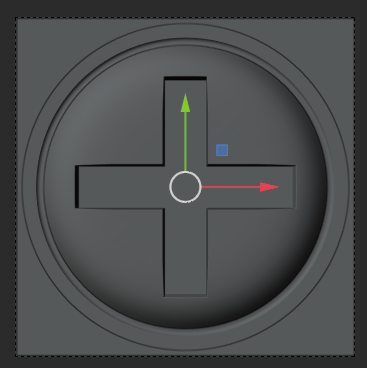 That’s great and all but not really useful. To make it useful I needed to set up some materials. This is what the same screw head looks like when I apply a normal shader to it. The normal shader encodes, in rgb pixels, the way that light would bounce off of a surface if it were 3 dimensional rather than 2 dimensional. The colors represent the deviation from the surface normal (perpendicular to the face). So it looks bumpy without actually being bumpy.
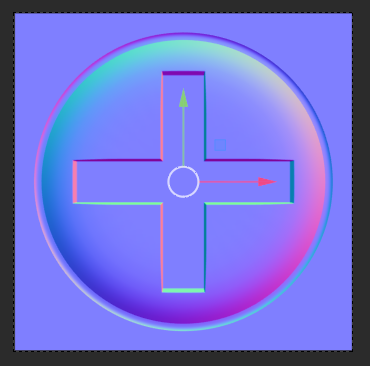
And this is what it looks like when I apply a depth shader to it. This one colors the surface in a smooth gradient from black to white based on the distance between two objects. I made these objects two non-rendering empties because that was a useful way to represent them. You could use anything. The distance between world 0 and the camera. The bounding box z dimensions of the model, or just some arbitrary numbers.
And this is the shader node graph for both the depth and normal shaders. I combined them for convenience and set up a switch to go between them, but you wouldn’t need to do that.  Since the entire depth graph is visible I will go over that first. I’m passing all of these into an emission shader because emission is a pure representation of the output color we are looking for. No lights or shadows mucking things up. I get the position of the geometry that has the material applied to it with the geometry node and pass that to a Separate XYZ node. We are only interested in the Z position so I take that and pass it to a Map Range node. I want to take the distance between my two measurement objects, my ZMin and ZMax, and remap that distance to a 0-1 scale. This will give us a pure black to pure white gradient. I pipe that result into the emission shader and then pipe that to the material output. In this case I go though my mix shader for switching from depth to normal, but I wouldn’t need to. You might notice that the ZMin and ZMax are purple. That is because those Value nodes contain a float driven by the Z position of my two measurement objects. You can drive damn near any value with any other in blender just by right clicking on the input field and clicking on add driver. It’s something I don’t do nearly enough of but it’s very handy. 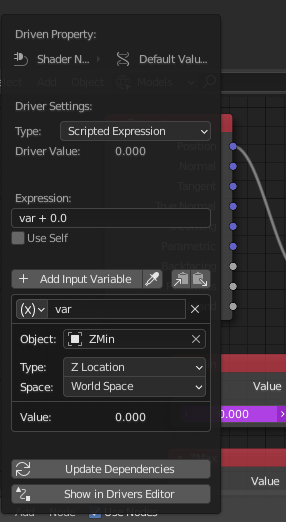 Now for the normal map. As you can see up there I use another geometry node (I could have used the same one, but whatever) and pass that into a node group that converts the normal vector into color data. This is what’s in that node group. 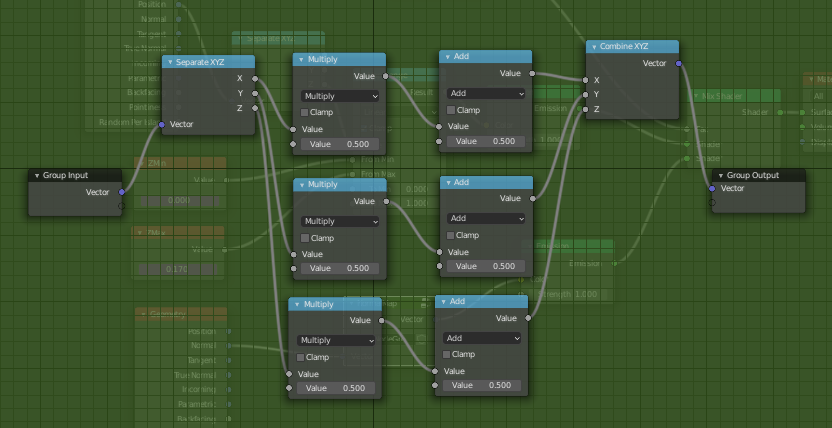 I could absolutely clean this up and simplify it, but this is working. I’m taking the normal vector and converting each channel into the appropriate color. It set up like this because I was messing with each of the channels for a bit to get them tuned. I might clean it up, but it’s working now so I probably won’t bother. The Combine XYZ node is doubling for a Combine RGB node, but numbers are numbers and Blender doesn’t seem to care what node they come out of. I take the new colors, put them into an emission shader and we’re almost done. Now for the real reason I put together this setup. Baking. The common workflow for this sort of setup is to make an empty image texture and ‘bake’ the detail from your screwheads or whatever into that image texture. Then you save that out to a file and you’re done. Great, right?. No, it blows. Baking is slow, uses a different render path than I’m using to display the results, and sometimes contains artifacts and issues that you can’t see before the bake is done. I had depth and normal maps where two adjacent pixels that should have had a lot of contrast between each other turn into a mushy mess when baking. To get the result out of the new method I use EEVEE (Blenders real time rendering engine) in the camera viewport and I press this. 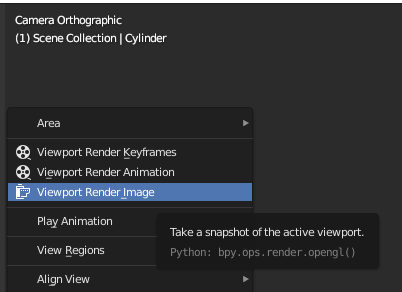 Using this new method those pixels come out perfect. What you see is what you get. Not only that, but when reapplying the depth information, I now get perfectly sharp edges and details. What is the cost of this increased precision? Well I went from bake times I could measure in minutes to render times I can measure in seconds. More precise, faster, and easier to iterate. It’s vastly better.
Then it’s a click of Image - Save As to save the OpenEXR file and I’m done. I think that, in the future, I could set up a python script to run through the whole process for any maps I have to export and it could be a one click type of process. For now though, this works, and more important, it works so much better than baking. Of course this works for flat surface details. Stealing the detail off the Venus De Milo might take a bit more work, but I have some ideas about that I might sort out one day. Last Monday I posted a link. Just a link. The link led to the game that I finished during the Global Game Jam. Like everyone participating in the jam, I saw the theme on Friday, worked on the game Friday night and Saturday, and finished it up on Sunday.
That’s it. That is all the time you have to go from a topic to a concept to a finished game. Hopefully that’s enough time because you won’t be getting any more. Even if you manage to finish up a game in that amount of time, the game you make will likely be bad, but fair’s fair, all games are bad in the first few days. I had one main goal going into this jam. I was going to make a 2D game. Every other jam game I have worked on, except the text based ones, have included some 3D modelling at some point. So that was my hard limit. No 3D. I also wanted to do something with really tight pixel and palette restrictions. I went with only 6 colours and a resolution of 160 x 144. That was the resolution of the original Gameboy. I figured if that was enough for Tetris it would be enough for me. I thought about using an entirely 2D engine or framework, but I opted to use Unity since I am the most familiar with it and time is limited during a game jam. I also decided to do this one solo. Meaning that everything that isn’t included in the engine, I made. Graphics, I make em. Sounds, I make em. Game code, I write it. Physics… well physics comes with the engine but I did connect up all the systems to make a string that wouldn’t just suddenly break for no apparent reason. Getting that to work was much more difficult than I had anticipated. Since I posted the game right after the jam, I have gone back to it and fixed up a couple of things to make it slightly less aggravating. It’s not what I, or any person who enjoys things, would call good. It’s bad, but at least it’s bad in the way that I intended. Also the sound doesn’t work in the web build. I’m not sure exactly why, but it might be something to do with not having a Start or Intro screen. I usually try to avoid having an intro screen for jam games just as a sort of aesthetic choice. I want people to be in and playing the game instantly. No preamble. No lore dump. Just load it up and start playing. Seems like, in this case, I might need to create a start screen to get sounds to play during the rest of the game. I have participated in quite a few game jams. They are great for knocking the creative cobwebs off and getting you working and thinking about developing something functional. You don’t have time to get bogged down in trying to create an elegant solution to every problem. You just have to make it work. And when the weekend is over, so is the project. That’s it. You never have to think about it again. Game jams are excellent prototype, evaluate, and move on, training. I don’t tend to go back to jam games trying to make them better or continue developing them. If they are broken, I leave them that way. For this one, I will probably make a slight exception. I would like the sound to work on the web build, but I don’t want to put much time into fixing it. If I can get the sound working by adding a start screen, I suppose that is not a massive task. If that doesn’t work I fear the game will be doomed to silence forever. And that will be okay. After all, it’s a game I made over a literal weekend. I did learn the ins and outs of Unity’s new input system, and that’s pretty good. I did learn about the 2D side of the Unity physics system, and that’s pretty good too. If I can get the sound working I will call the jam an unqualified success. Even if the game is sort of aggravating and not all that great. I’ll see what I can do. |
Archives
February 2024
Categories |

 RSS Feed
Owen McManus