
|
This will be a short one. I’m really just here to praise the graphical Swiss army knife that is Blender. So, a little bit ago, I was working on some textures. The task was to pack a non-alpha grayscale image into the alpha channel. Non-alpha, in that it wouldn’t be used as transparency data for the image. I figured that a channel was a channel so how hard could it be. I’ll back up slightly. Sometimes, when working with textures, especially for realtime 3d applications like games, you want to pack as much information as you can into each texture. Standard image files are made up of three or four channels. The Red, Green, Blue, and sometimes Alpha channels. Usually, each channel is a grayscale image that represents steps from black to white, the contribution of each channel's pixels to the final image. If one pixel of the green channel is one hundred percent white, then the green contribution to that pixel will be turned up as high as it can be. Now there are a lot of perceptual issues that mean that some images have higher contributions from some channels, or they apply different falloff curves to different parts of the color spectrum, for simplicity’s sake, let's just say that each channel has a full range of 128 or 256 steps between black and white for each pixel. There is nothing saying that you need to use those grayscale channels to build up parts of the same image. What if you have three, entirely different, grayscale images. Rather than using up all three channels of one texture, why not pack all of those into a single texture file using the R, G, and B channels. If you have a fourth one, you can pack that into the alpha channel. At least that’s what I thought. Channel packing using the R, G, and B channels is pretty trivial, and pretty much any image editor will let you do that. Packing stuff into the Alpha channel proved to be a bit more difficult. The Alpha channel is usually used for transparency. Same rules apply, though. It is a grayscale image that controls how transparent or opaque each pixel is. The problems happen when you make a pixel 100% transparent. Most image editors are pretty smart. They will try to infer what you are trying to do. If you convert an image from say, RGB color format to CMYK for printers, there is a set of steps and conversions that the image editor will go through to try to keep the colors as accurate to what you intended as possible. The same thing happens when you set a pixel in the alpha channel all the way to transparent. Most image editors will set that same pixel in the R, G, and B channels to zero as well. It makes sense when you think about it. If you are saving that image out with a bunch of zeros, data compression schemes can shrink the file quite a bit. Only problem is, when you are trying to do channel packing, you don’t want to lose that information. Now, not all image editors did this. Some kept all the info, but had other issues. They couldn’t read the input images properly, or they couldn’t create an output image properly. They didn’t work with the formats I needed, or they lacked support for linear color space (sort of a must for some texture work). After trying all the standard image editing tools I have, and it’s not an exaggeration to say that I have an awful lot, I found that only Blender did everything that I needed. Not only that, but it did it better and easier than any of the others. I will qualify that ‘easier’. Blender can look like the control panel of a 747 and it has functions buried under its function, but if you happen to know how it works, you can mix and match and mess with images in a truly unrestrained way. I used the compositing part of Blender. It’s intended to be used to layer rendered or filmed images, blending them and adjusting them until they look seamless. It’s the sort of software used to piece together visual effects sequences in movies. Because of that raw image manipulating power, it’s also uniquely suited to ripping apart and reassembling textures in the most amazing ways. I created a pipeline that split all of the channels and then recombined them in any way that I liked, and any set of images that I used as the input could be run through the system and recombined. Not only that, but Blender works with damn near any image format that you could imagine, and it’s all hardware accelerated. I could rip apart massive 5K textures and put them back together into uncompromising .EXR files (without a doubt, the best image format that people have come up with), in literal seconds. I don’t know that a tutorial on how to do it is exactly warranted here, but this is a picture of the node tree that the textures run through. Blender is really one of the best things to happen to graphics in a very long time. 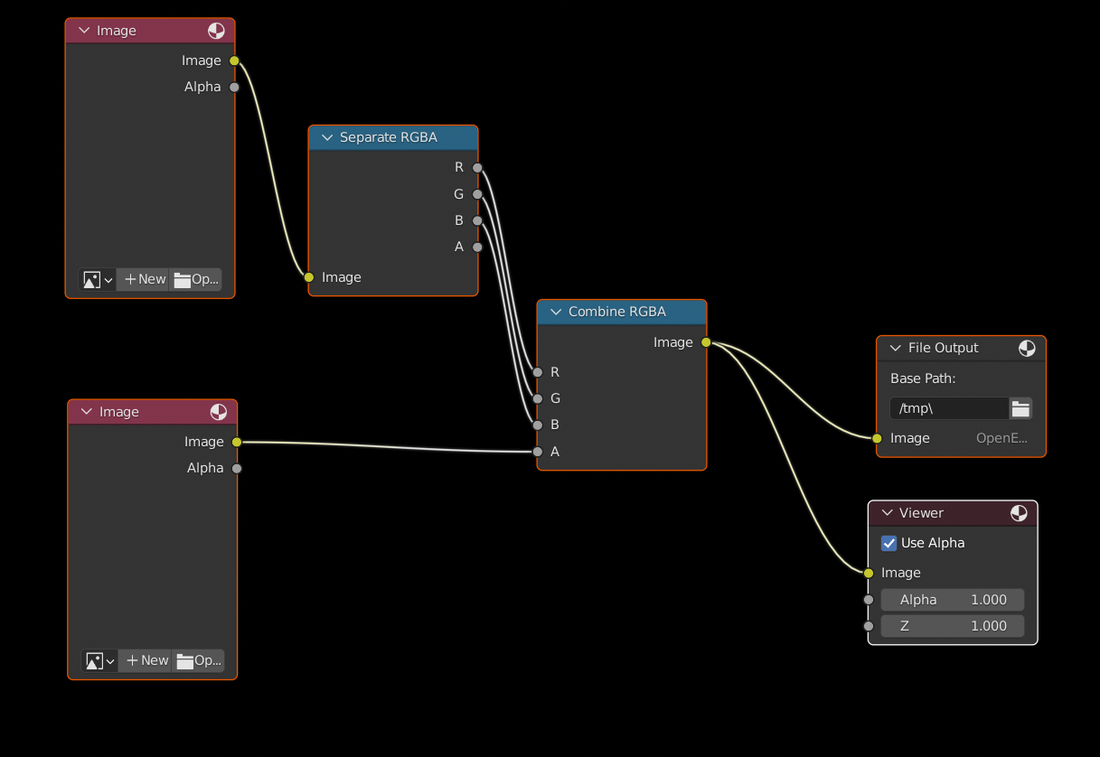
0 Comments
Leave a Reply. |
Archives
February 2024
Categories |
 RSS Feed
Owen McManus